
Homemade Christmas
My exams are finally done *does a wee happy dance*, and now I can really start to get excited about Christmas (the countdown on my fridge that started at 100 is now at 7 - one week people!). However, thanks to exams, and the fact that I am a student, I am going to need some low cost, small timescale ideas...and here's what I came up with:
1) Cards
I have always loved scrapbooking and making cards. I feel it is such a lovely way to add a personal touch to your gift. But card making needn't be expensive! See all those little ribbons on jumpers that annoy you so much? Cut them off, and save them in a little box for adding bows and edges to cards. Same idea with the buttons you get with cardigans (I have a huge tub just full of buttons in my house, which is weirdly satisfying to rake through). The ideal personal touch though, is photos. I have an account with Snapfish and, when I downloaded the app, I got 50 free prints every month for a year. A whoel year. All I have to do is pay the £1.99 postage! Now, as you are reading this, this offer may not still apply, especially for my American readers (hello! Lovely to have you!), but there are so many other photo sites that will give you an introductory offer when you sign up. Perfect for making all your Christmas cards!
Here is an example of a card I made last night, using my old maths jotter as the card base (did I mention my exams are over?). Almost anything can be used if you put your mind to it:


Decorations
Okay, now I had a lot of fun with this. I felt like a little kid at primary school, in the last week of term before Christmas and all you do is make decorations. If only university was like that. Instead they gave us exams for Christmas.
And so to celebrate the end of these lovely exams, I invited a fellow ex-primary, current university student round to my flat (as featured in the yellow card above). We had the most magically festive and childish afternoon creating decorations for my shamefully bare flat! We had the Christmas tunes blaring and a plate of homemade apple crisps to keep us going (the recipe can be round by following this link)

For our first make, we went old school - pasta decorations. It's so much fun to play about with the pasta until you get a design you are happy with! You can make angels using the 'bow' pasta for wings (I always called it butterfly pasta - am I the only one?), penne for the body and a bead for the face. However, we both went down the same lines and made festive stars! Great minds think alike! As we were being resourceful, I used nail polish to add a bit of sparkle to my star, while Catherine used some tricolour pasta to add that festive vibe. A bit of PVC glue and some beads and you have an instant, old school Christmas decoration!


One of my favourite decorations is bunting. You can have it up at all times of the year, depending on the colours you go for! Again, being resourceful, we made a mess of my kitchen table and cut out loads of triangles from magazines that made us feel festive - just choose whatever is personal to you! We went for: chocolate (of course), sparkly nail polish and some festive colours. To make it a little more personal, I then picked some favourite photos from last years Christmas celebrations and added them to the bunting. It makes me smile when I look at it, and its nice to think that next year I will be making one with this years memories that are still to come!
To hang up all your lovely pictures and magazine snippets, I used some glittery string (yes, reused from last years wrapping) and some super cute wooden pegs (these can be found on places like ebay or in Poundland for dirt cheap). Then decide the order of your pictures and peg them up. To add a little more body to it, we also made some hanging beads from string and a random box of beads I have (having random boxes of stuff comes in so handy for last minute decorations and cards!)
The result, well, I'll let you judge that:
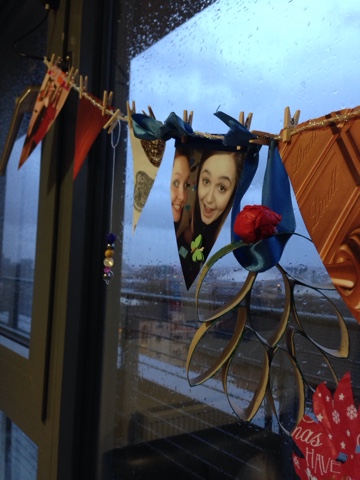

In the first picture, you may also see another decoration, and this one is one of my favourites (which I cannot claim credit for, thank Catherine for this one). The mistletoe outline you can see hanging from the bunting was made using toilet roll tubes and not much else! To create the leaf shape, pinch either side of the tube and cut a 2cm width out of the tube, This will leave you with the perfect leaf shape. Then simply arrange them as you like (I made a Christmas tree as shown below) to make some really great decorations. I love the fact that if you hang them up on the window, you can see the blustery cold rain of Glasgow, while we sat inside with hot chocolate. The perfect winter scene in my eyes.

As well as a cardboard tree, we made a tinsel tree. This is super easy and super cute! All you need is some paper or card, some tinsel and sellotape. And a bow for the top if you are being super super cute! Simply create a cone out of the paper, making sure to cut the bottom to make an even surface for the tree to stand up. The sellotape the tinsel to the top of the cone and wind it round the cone until no paper is showing. then stick the remainder of the tinsel inside the cone. These can be made of all different colours of tinsel and they add such a nice sparkle to window sills and table tops.
The final make is the most primary school of them all - paper snowflakes.
Do you remember making these in school? I do!
Do you remember the mess they make? I do now!
We chose some festive tissue paper to make ours out of. This works really well as it still lets the light in from outside but adds a bit of colour to the display. To make, simply cut a rough circle out of your chosen paper and fold into quarters. Then start cutting triangles, rectangles or circles out of the paper, making sure that you dont cut all the way up the fold, as then it will fall apart. When you are happy with your design, unfold to reveal the snowflake and hang up with pride!

I had so much fun making these decorations, and I really feel it has added a lot of festivity to my flat! They would be great decorations to make with kids (or just big kids like us) as they are easy to do and only really use things you would have in your house anyway!
Let me know how you get on and I would love to see pictures of your creations! Just tweet me @LaurieBeat or leave a comment below!
Have fun, and have an amazing Christmas!
No comments:
Post a Comment